How To "correctly" Put A Sling
On The MP5 Submachine Gun
==========
Standard Liability Disclaimer: Although I have used these instructions in making my own props,
I accept NO RESPONSIBILITY if you ruin your own components or other parts
using these instructions. These techniques work for me, they might not work for you.
These instructions are worth exactly what you paid for them.
Okay, so you currently own or have or will own an MP5. Now one of the first things
everyone buys right after extra mags, is the infamous 3 point tactical sling.
Now the bad thing about the 3 point slings is the absolutely horrid instructions that
they ship with. Vague in the extreme. But thanks to a Japanese web site, we now have easy to follow
instructions on how to put the sling on the MP5 airsoft gun.
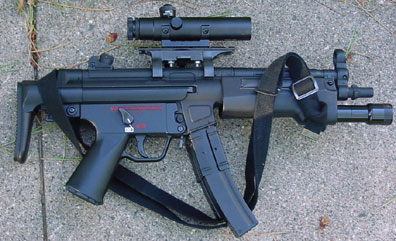
First, a picture of the WRONG way to do it. The really funny thing is that I mounted
this sling by following the instructions that actually came with the sling. Silly me.

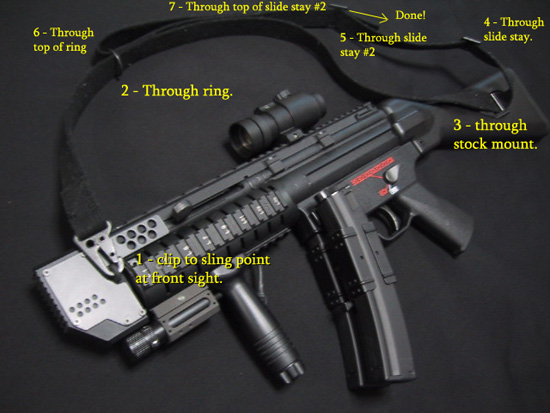
So, how DO you mount the sling on the MP5? The following instructions should work with any MP5,
or G3 based rifle (except for the PSG-1), both the solid stock and slither stock versions of each gun.
The PDW and MP5k have a snap swivel at the rear of the gun and lacks the eyehole mount at the front sight.
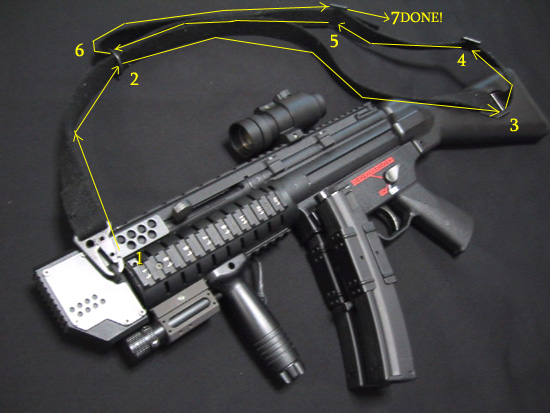
Seems pretty simple now, doesn't it? When you loop the main circle around your torso, there will
be a strait band of sling material running up the side of the gun, from the front sight to the
stock loop. You can even remove the sling and sling it over your shoulder just like a regular rifle.
This has been seen in use in several episodes of Stargate SG-1, usually where Colonel O'Niell has
removed his MP5 and set it aside. A very versitile system when done correctly.
The metal 'slide stay' as I call it at position '4' (it sorta looks like this: [|] )can also be used
if your sling is too long for you when attached. Just shrink down the slack from position '7' and
run the tail of the sling through position '4.'
Also, don't get the sling twisted when threading it through the necessary loops and slide stays.
If it gets twisted that will keep the sling from sliding correctly and may make it difficult to
bring to the ready position quickly. Take note of the sling placement at position '1' and how
it loops over.
I hope this helps everyone out!
All images, unless specified, are Copyright
2004-2006
Rookscastle.com.